Contact
Form Pro Module Help for MIVA
Merchant v5
Module
Installation and Upgrades

This is where you add
or upgrade the module
in the Mall Library.

This
is where you assign and
register the module in
your store.
New Installation of
Contact Form Pro Module:
-
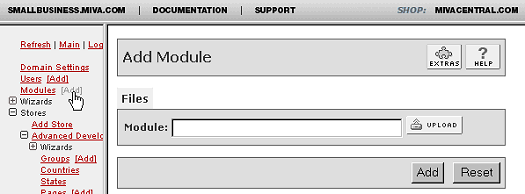
Run the admin.mv.
-
Click on "Add"
next to the "Modules"
link.
-
Click the "Upload"
graphic button.
-
Enter the filename
of the module on your
local drive.
-
Press the "Upload"
button.
-
Press the "Add"
button.
Setting
up your store to use the
Contact Form Pro:
-
Open the "Stores"
branch.
-
Click on the arrow
beside the store name.
-
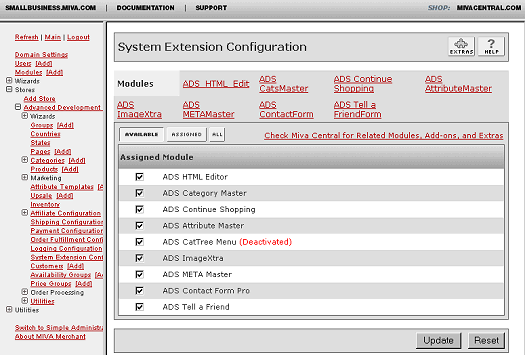
Click on "System
Extension Configuration"
below.
-
Select the check box
for the ADS Contact
Form Pro.
-
Press the "Update"
button.
-
Select the "ADS
ContactForm"
tab
-
Enter your license
key
-
Press the "Update"
button
- This
tab give you an overview
of the module and
quick start guide.
- The
module will automatically
create and configure
a new Contact Us "ADS_CF"
page in your store,
and insert all of
the necessary templates
and items.
- You must include a
link somewhere in
your Store to the
new Contact Page,
for it to be accessible
by the public. Included
below are sample links
in both Merchant Token
format and regular
HTML format. The links
can be used in the
Navigation Bar template,
Global Headers/Footers
template, Individual
Page templates, etc...
- <A href="&mvt:global:sessionurl;Screen=ADS_CF&Store_Code=&mvta:global:Store_Code;">Contact
Us</A>
- <A href="http://stlads1:8000/mm5/merchant.mvc?Screen=ADS_CF&Store_Code=ads">Contact
Us</A>
See the module
configuration and
template layout sections
to get more details about
controlling and customizing
the module.
--------------------------------------------------------------------------------
Upgrading the Contact
Form Pro Module in the
Mall:
-
Click on the "Modules"
link.
-
Click the edit button
next to "ADS
Contact Form Pro".
-
Click on Files.
-
Click the "Upload"
graphic button.
-
Enter the filename
of the modules on
your local drive.
-
Press the "Upload"
button.
-
Press the "Update"
button.
--------------------------------------------------------------------------------
Uninstalling the Contact
Form Pro Module from the
Store and the Mall:
-
Open the "Stores"
branch.
-
Click on the arrow
beside the store name.
-
Click on "Pages"
link.
-
Click the edit button
next to "ADS_CF
Contact Us".
-
Scroll to the bottom
of the page and Delete
the Page.
- Repeat
steps 3-5 for any
additional Contact
Pages you may have
created
- Click
on the "Items"
Tab at the top of
the page. Search for
Item "ads_contactform
". Delete the
Item "ads_contactform"
from your store by
clicking the Delete
button at the bottom
of the page.
-
Click on "System
Extension Configuration"
in the left side navigation.
-
Unassign the "ADS
Contact Form Pro"
module from your store
by unchecking the
box and clicking Update
button.
-
Click on the "Modules"
link.
-
Click the edit button
next to "ADS
Contact Form Pro".
-
Click the Delete button
to remove the module
from you MIVA Merchant
domain.
|
