Image
Extra Module Help for MIVA
Merchant v5
Module
Installation and Upgrades
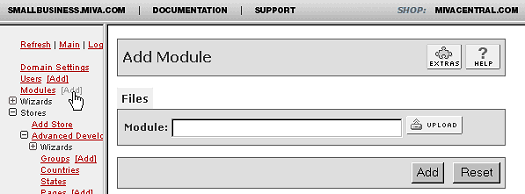 This
is where you add or upgrade
the module in the Mall
Library.
This
is where you add or upgrade
the module in the Mall
Library.
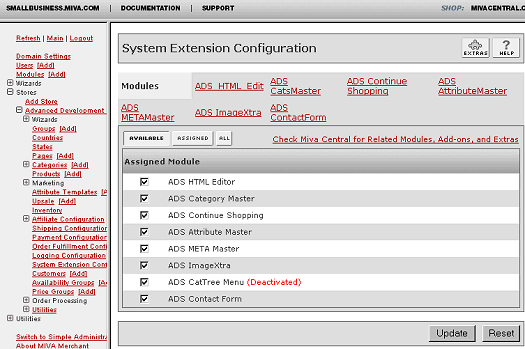
This is where you assign
and register the module
in your store.
New Installation of
Image Extra Module:
-
Run the admin.mv.
-
Click on "Add"
next to the "Modules"
link.
-
Click the "Upload"
graphic button.
-
Enter the filename
of the module on your
local drive.
-
Press the "Upload"
button.
-
Press the "Add"
button.
Setting
up your store to use the
Image Extra:
-
Open the "Stores"
branch.
-
Click on the arrow
beside the store name.
-
Click on "System
Extension Configuration"
below.
-
Select the check box
for the ADS Image
Extra.
-
Press the "Update"
button.
-
Select the "ADS
ImagExtra" tab
-
Enter your license
key
-
Press the "Update"
button
- This
tab give you an overview
of the module and
quick start guide.
- In
order for the module
features to function,
you must incorporate
the provided tokens
or their variations
into your category
and/or product pages.
You must also provide
the image settings
for category and/or
product pages where
you would like to
use the features.
--------------------------------------------------------------------------------
Upgrading the Image
Extra Module in the Mall:
-
Click on the "Modules"
link.
-
Click the edit button
next to "ADS
ImageXtra".
-
Click on Files.
-
Click the "Upload"
graphic button.
-
Enter the filename
of the modules on
your local drive.
-
Press the "Upload"
button.
-
Press the "Update"
button.
--------------------------------------------------------------------------------
Uninstalling the Image
Extra Module from the
Store and the Mall:
-
Open the "Stores"
branch.
-
Click on the arrow
beside the store name.
-
Click on "Pages"
link.
-
Click the edit button
next to "PROD
Product Display".
- Reset
the templates you
used to incorporate
the Product and Category
settings for this
module by selecting
either your previous
Template Version or
the "Original"
version provided by
MIVA in the version
history box. Click
on "Recall"
then Update.
- Click
on the "Items"
Tab at the top of
the page. Search for
Item "ads-imagextra".
Unassign the Item
"ads-imagextra"
from the PROD page
by unchecking the
box and clicking Update
button.
- Repeat
steps 3 through 6
for the "CTGY
Category Display".
- Click
on "Pages"
link again and Items
Tab.
- Click
the edit button next
to "ads-imagextra"
Item and click the
Delete button.
-
Click on "System
Extension Configuration"
in the left side navigation.
-
Unassign the "ADS
Image Extra"
module from your store
by unchecking the
box and clicking Update
button.
-
Click on the "Modules"
link.
-
Click the edit button
next to "ADS
Image Extra".
-
Click the Delete button
to remove the module
from you MIVA Merchant
domain.
|
