External
File Pro Module Help for MIVA
Merchant v5
Module
Quick Start Guide
Extra Template Management:
- In Merchant Admin, Click on your Store Name
- Click on "ADS Extra Template Manager Pro" tab. For your convenience, this tab will also be available when editing any page where "ads-templatextra" item is assigned.
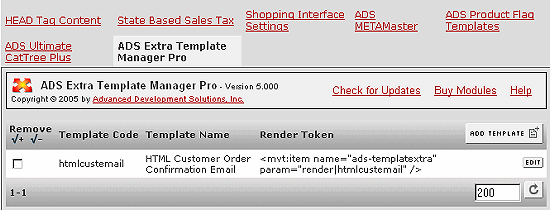
- Here you can either click on "Add Template" button at the top, to create a new Extra Template or click on the Edit button next to one of the existing templates to edit the template(Screen Shot 1).
- The main Template Management screen also provides a column with an Item Render Token, which you can quickly Copy & Paste into any Merchant Related Page Template. Please remember to also assign the "ads-templatextra" item to the page(s), where it is being used.
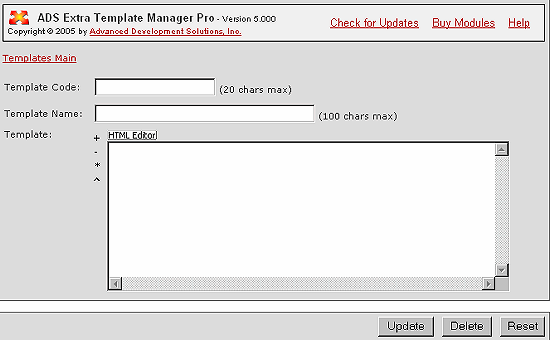
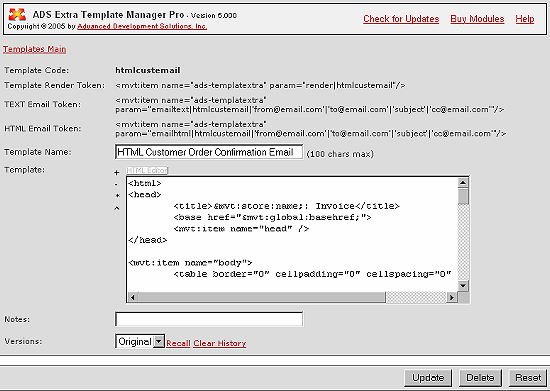
- Please see Screen Shots 2 & 3 below, for Adding and Editing Extra Templates.
- Please see the Available Item Render Token Reference below for explanation and examples of using the available Item Render Tokens.
Screen Shot 1 - Main Extra Template Management Screen.
(Mouse
over the various settings
and options to get more
information):

Screen Shot 2 - Adding New Extra Template.
(Mouse
over the various settings
and options to get more
information):

Screen Shot 3 - Editing Extra Template.
(Mouse
over the various settings
and options to get more
information):

This module provides for an an unlimited number of Extra Store Morph Technology(SMT) based Templates. These templates can be rendered in or emailed from any Merchant SMT based template. All
template code references and necessary specifications
are passed in the Item Parameter
using the Render Tokens
describe below:
- Module automatically installs and configures the required item, as described above.
- You must assign the "ads-templatextra" item to the page(s) where you would like to use it.
- You must have the template created and available before inserting the item Render Tokens.
- You must insert an appropriate item Render Token in any page related template(s) to utilize module features. Render Tokens can be used in Page Templates, Product List Layouts, Messages, Headers, Footers, etc.. Templates used must be Store Morph Technology(SMT) templates.
- Module includes five Render Tokens in order to provide various methods for rendering and emailing available templates, and also for assigning and evaluating variables and executing built-in MivaScript functions. Depending on a type of Token used, additional information such as Parameters may also need to be included.
- "render" Token provides a way to render the contents of Extra Template in any other SMT enable merchant template. This is very useful in using and re-using additional content in template(s) of your choice, providing one place to quickly manage it. Some example uses are: Category Tree Headers/Footers, Category or Product Page layout variations, additional content area(s) placed anywhere in your Store Template; content such as News, Events, Schedules, Trade shows, FAQ's, Contact Information, Messages, etc...
"render" Example - Create and Render Extra Templates for the Category Tree Header and Footer.
Here are the steps in doing this:
- Edit your store by clicking on the store name in the Merchant administration.
- Click on "ADS Extra Template Manager Pro" tab.
- Click Add Template button at the top.
- Complete the form by providing a unique Template Code, Template Name and the Template contents. You can use "cattreeheader" for Template Code, "Category Tree Header" for the Template Name and content of your choice for the Template contents. The Template is SMT enabled so the use of HTML, SMT Items and Entities is allowed.
- Click the Update button at the bottom.
- Repeat steps 3 through 5 for creating the Category Tree Footer template. Provide the Code, Name and Template for Category Tree Footer.
- Now that you have the Templates created. The ADS Extra Template Manager Pro main screen will display an item Render Token(s) to be inserted in your template pages. The item Render Tokens will be <mvt:item name="ads-templatextra" param="render|cattreeheader" /> and <mvt:item name="ads-templatextra" param="render|cattreefooter" />.
- Copy and Paste the sample Render Tokens in all Page Templates using the Category Tree Item. You will paste the cattreeheader item render token just above and cattreefooter render token just below Category Tree Item in the Page Templates. This is done by clicking on Pages, under your store name and selecting the pages such as SFNT, PROD, CTGY and PATR to edit. Locate the item "<mvt:item name="category_tree" />" in the page template and Paste the code just above and below the category_tree item.
- You will also need to make sure that the "ads-templatextra" item is assigned to all pages where it is used. This is done by clicking on the Items tab of related pages and assigning the "ads-templatextra" item to the page.
Above TemplateXtra Item param field contains the action "render", followed by the Template Code you assigned when creating the Extra Template. A pipe "|" character is used to separate individual fields within item param field.
- "emailhtml" Token provides a way to HTML Email the rendered contents of Extra Template from any other SMT enable merchant template. This is can be very useful in sending HTML formatted emails from anywhere in the Merchant system, for any reason. The email templates can be used and re-used, and since the Item Render token controls the To, From, Subject and CC information the same email templates can be be sent using different Headers. This provides a quick and convenient way to manage your email templates. Some example uses are: HTML Customer Confirmation Email, HTML Merchant Notification Email, Welcome New User Email, Contact Forms, Tell a Friend Forms, Information Requests, Automated Coupon Delivery, etc...
"emailhtml" Example - Create and Setup Extra Templates for the HTML Customer Confirmation Email.
Here are the steps in doing this:
- When the module was first installed, there was an Extra Template automatically created. The Template uses Information from "INVC Invoice" Page, Order Contents and Customer Information.
- The created template can be accessed by clicking by clicking on your store name in the Merchant administration. Then clicking on "ADS Extra Template Manager Pro" tab.
- You should see a template with a code of "htmlcustemail". Click on the edit button next to the template.
- Take a look at the template and make any necessary revisions.
- Click the Update button at the bottom if you made any changes.
- Copy and revise the provided sample HTML Email Token <mvt:item name="ads-templatextra" param="emailhtml|htmlcustemail|'from@email.com'|'to@email.com'|'subject'|'cc@email.com'"/>, using a text editor. You will need to revise the from, to, subject and optional cc data with your information.
- A pipe "|" character is used to separate individual fields within item param field as seen in the sample item render token. First field(emailhtml) is an action, telling the module that htmlemail will be sent. Second field(htmlcustemail) is the code of the Extra Template we are using. The rest of the fields are Email related. Each Email related field can utilize SMT available variables, MivaScript expressions and built-in functions, instead of text strings. This provides great flexibility in sending the emails and creating a variable based subject line.
- Here is an example link used in sending the HTML Customer Notification Email:
<mvt:item name="ads-templatextra" param="emailhtml|htmlcustemail|'from@email.com'|l.all_settings:order:ship_email|'Order '$l.all_settings:order:id$' for '$l.all_settings:order:ship_fname$' '$l.all_settings:order:ship_lname$' Invoice'|'cc@stlads.com'"/>
The above example uses available Merchant template variable and MivaScript expressions to dynamically populate the To Email address and the Subject line. The From Email address is preset and CC field is optional. Notice the use of "l.all_settings" variable, all local template variables that are accessed as "l.settings" in the template, are passed as "l.all_settings" to and from the module field. You can also use the global variables by using "g." as the variable prefix. Any variable available to the template can be accessed this way.
- Make sure you revise the provided example Item Render Token above with your valid email address(s).
- You will paste the revised Item Render Token in the INVC Invoice Page Template. This is done by clicking on Pages, under your store name and selecting the INVC Invoice page. Locate the item "<mvt:item name="messages" />" in the page template and Paste the code just below the it.
- You will also need to make sure that the "ads-templatextra" item is assigned to the INVC page. This is done by clicking on the Items tab of the INVC page assigning the ads-templatextra item to the page.
Above TemplateXtra Item param field contains the action "emailhtml", followed by the Template Code assigned when the Extra Template was created and customizable Email related fields. A pipe "|" character is used to separate individual fields within item param field.
- "emailtext" Token provides a way to TEXT Email the rendered contents of Extra Template from any other SMT enable merchant template. This is can be very useful in sending unformatted TEXT emails from anywhere in the Merchant system, for any reason. The email templates can be used and re-used, and since the Item Render token controls the To, From, Subject and CC information the same email templates can be be sent using different Headers. This provides a quick and convenient way to manage your email templates. Some example uses are: TEXT Customer Confirmation Email, TEXT Merchant Notification Email, Welcome New User Email, Contact Forms, Tell a Friend Forms, Information Requests, Automated Coupon Delivery, etc...
"emailtext" Example - We did not provide an automatically installed Extra Template for a TEXT Customer Confirmation EMail, since controlling the layout and spacing of text confirmation emails is a bit tricky, especially considering the fact the Merchant SMT templates compress white space so what you have in the template will not be rendered the same way, but it can be done. Follow the emailhtml example above in Creating and Setting up Extra Templates for the TEXT Customer Confirmation Email.
To make controlling TEXT Layout and Spacing easier, you can use the following tokens in the Extra Template fields. They will be replaced by associated characters when the template is rendered:
- %eol% - End of Line
- %spc% - Space
- %tab% - Tab
Here is an example Item Render Token used in sending a similar TEXT Customer Notification Email:
<mvt:item name="ads-templatextra" param="emailtext|textcustemail|'from@email.com'|l.all_settings:order:ship_email|'Order ' $ l.all_settings:order:id $ ' for ' $ l.all_settings:order:ship_fname $ ' ' $ l.all_settings:order:ship_lname $ ' Invoice'|'cc@stlads.com'"/>
The above example uses "emaitext" as the action field and "textcustemail" for Template Code.
- "mvassign" Token provides a way to assign and use new variables at run-time right from your template. The variable assignment can utilize MivaScript expressions and built-in functions. Variable values can then be used as SMT entities for display or in the IF statements and FOR loops.
"mvassign" Example -
Displaying additional product images if they exist on the server:
<mvt:item name="ads-templatextra" param="mvassign|l.all_settings:image1_exists|sexists('/mm5/graphics/00000001/' $ l.all_settings:product:code $ '_1.jpg')" />
<mvt:if expr="l.settings:image1_exists">
<IMG SRC="graphics/00000001/&mvt:product:code;_1.jpg">
</mvt:if>
You can use the same technique to create short titles, calculate percent discounts, create search friendly titles, etc...
NOTE: Caution should be taken in using MivaScript parameter Functions, since they allow you to directly create and modify Merchant Variables, Arrays, and Execute Built-In functions, right from the template, at run time.
"mveval" Token provides a way to evaluate MivaScript expressions and built-in functions at run-time right from your template. It works just like the mvassign token, except the expression result is rendered, not assigned to a variable.
"mveval" Example -
Displaying short product titles on category pages. This example also illustrates the use of "mveval" Parameter Function:
<mvt:item name="ads-templatextra" param="mvassign|l.all_settings:namelength|len(l.all_settings:product:name)" />
<mvt:if expr="l.settings:namelength GE 25">
<mvt:item name="ads-templatextra" param="mveval|(substring(l.all_settings:product:name, 1, 25))$'...'" />
<mvt:else>
&mvt:product:name;
</mvt:if>
More MivaScript API Documentation can be found here: http://smallbusiness.miva.com/support/docs/api/
|
